The Kiln Refurbishment Adventure

Hi All,

In the past week my friend and studio mate Lavinia and myself finished an epic 9month quest to refurbish our new/old kiln that we scored for free from Bath Spa University where we both got our degrees in ceramics. And yes, it is FINISHED!!!!!!

We scored a Kilns and Furnaces 3phase front loader that used to be at Bath Spa University (we even used it while studying there).

Patrick1

The final stage in being the actual refurbishment. I was encouraged to post about this as there are surely more than a few potters out there daunted by the prospect but too strapped for cash to pay someone to do it for them. I should point out now that we did not do ANYTHING electrical, we did get a professional kiln electrician to do the elements and whatnot.

Patrick3

Patrick2

Patrick6

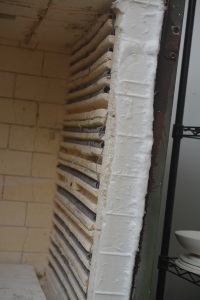
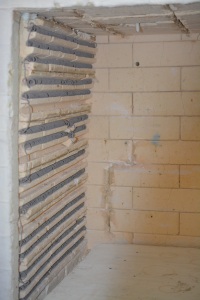
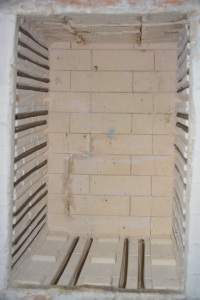
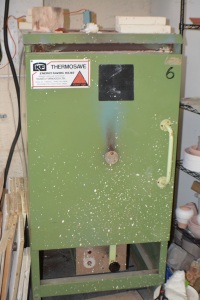
So that is the before…. what we planned to do is only replace the sides and hearth. Before anyone goes cringing about wasting elements, those were knackered too.

Thanks to the very helpful advice of AG our wonderful local kiln electrician, who spent over an hour of his free time on the phone talking me through what to do. As well as Clive ‘the Kiln Man’ , now retired (mostly) who wound the new elements.

So for our part, I contacted Kilns and furnaces and got a quote for a new set of bricks, we chose this as neither myself nor Lavinia had the time or skill to carve channel bricks etc. K&F were quite reasonable, when you factor in the time and skill factor which we didn’t possess.

top tip: have pliers, rubber mallet, chisel, spray bottle for water, and a vacuum handy. The mortar we used is the same as K&F use to make their kilns. Don’t forget a metal spatula to spread the mortar.

The first thing we did was put the isolator switch to OFF and cable tie it in position, this is very important, you cannot be too careful. Then I started ripping the elements out, they snapped like twigs they were so brittle. Its much easier to rip them out with a pair of pliers rather than bare hands, they are excellent on the pins. Then Lavinia knocked out the left hand side and all of the hearth, she being R-Handed. I took out the right side the following day.

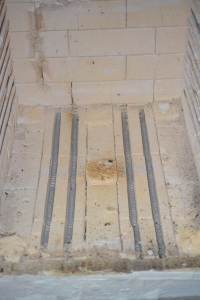
Once all of the rubble was removed, we vacuumed all of the bits out and did a dry run of laying the bricks to make sure they would all fit. Then we started actually laying them. first, we sprayed the sides to hold mortar with water, this was to help prevent the mortar from going off too fast. Halfway up the first side, we got the hang of it.
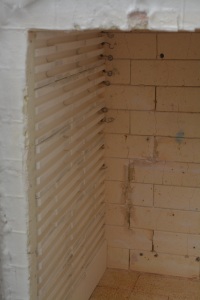
The bricks provided were for a 1,1,1/2 lay. That meant with each row we changed the position of the 1/2 brick to stagger the lines as best we could. Also we had to make sure the channels would meet up with the holes in the back for the elements. It took me a while to get into the swing of spreading the mortar thinly and evenly, but I got there in the end. There was a little room at the top, but we left it un-mortared (will explain later).

Patrick9

Once we finished that side, we put boards up against both sides of the kiln and wedged them in place, This was to ensure the bricks wouldn’t move while the mortar finished setting. When we got back the next day, they were rock solid.

I left the board we had used to brace new bricks, in place when I started on the right side. The reason for this was to protect the new bricks from my mallet. It doesn’t matter how careful you are, there is always a chance they will get damaged on the backswing. Once the rubble was removed and the area vacuumed again, we did a dry run with the hearth and the first few rows up the side. I was very happy and thought we didn’t have to put all the bricks in (IDIOT!!!). So we laid the side, leaving the hearth empty until we were done. Of course by the time we got to the top row I was getting pretty cocky about it all, and when the last row wouldn’t quite fit, I thought all it would need was a board over the brick and tap the board….. As I mentioned earlier, these bricks are very soft.
After that I refused to put anymore bricks in. But what we did to help them fit is take a little of the top sides of the bricks with a rasp to fit them in. Then we did the boards and brace routine after laying the hearth.

The next day, I started wedging the gaps with kiln fibre. Using a firm, blunt yet fine tool, I stuffed the cracks with bits, building it up till it filled the space. I also filled the gaps along the tops of the sides with fiber until I could stuff no more. Why use kiln fibre instead of the mortar we used on the bricks? The mortar does funny things when used on cracks where the bricks are set particular way, like the doors and roofs. It shrinks away and makes the problem worse. The best way is to wedge it full of kiln fibre which is just as refractory as the bricks and won’t shrink away. We also used fibre along the front of the hearth, the front doorframe bricks got damaged, so we decided not to add mortar as we will replace the damaged ones in the near future.

The roof bricks were ‘repaired’ with mortar, so were the door ones. Both look awful because the cracks are caused by the bricks being pulled apart, when they were stuffed with mortar and the kiln fired, the mortar shrank and pulled away from one side of the crack, degrading the exposed side further. Our problem there is those bricks can’t really be replaced by novices such as us. I think the metal frame of the door is constructed around the bricks, which means any replacement will never be the same. See the first picture and look at the roof, it’s a mess, but it it’s still sound. When I have more time to just sit back and chill, I’ll carefully chip back that mess.

So please please please, do yourself a favour if your kiln needs a little tlc. If you break a bit off, use mortar, but if there’s a crack to fill, stuff it with kiln fibre, your kiln will love you for it. But most cracks don’t need filling

If you were wondering why I have kiln fibre around the door frame, the door got twisted at some point before we got it, I think that’s why there’s a dirty great crack in the bricks. Anyway, the first time I fired Patrick, before the refurb, I went back late at night to check on the firing and found a huge gap along the bottom shining a glowing strip of light on the floor. With shaking hands I stuffed a bit of fibre in there using a longish metal tool, the kiln was over 1100C at that point and about 100C behind schedule. So I sat there one evening after work and framed the door. For that I used the merest smear refractory glue rather than mortar.

The final job was the elements. AG did a sterling job on that, he even fiddled with the thermocouple so it could be placed in the back instead of through the chimney. Here is the shiny new Patrick….

Patrick11

Another thing AG advised me to do, the maintain the new elements, was to do an empty low bisq cycle, then do a bisq for the first filled cycle. When you are only going to get a max of 100-150 (stoneware) glaze firings, proper kiln care is important.

I hope this proves as incentive to anyone else out there daunted by the prospect of refurbishing their kiln. It’s not as hard as it seems, and there is a fantastic network of potters and technicians out there that can guide you through it. But please, don’t do the electrical stuff unless you are a qualified electrician.

I live in Bath, Somerset, UK. So I can’t advise who your local experts are, but I’m sure if you ask a fellow local potter or pottery supplier, they can point you in the right direction.

Preparations for the Bristol Wool Fair are underway! And the photo shoot.

Busy busy busy, I hardly get any downtime at the moment, I had to go down to 2 days a week at my paid job to have time for my clay, and it still isn’t enough!
But! Patrick, our kiln (our as in I co-own it with my studio mate) is almost refurbished! Those of you who know me personally will know all about that little saga, but suffice it to say, neither of us had ever re-bricked a kiln a before, but we did it and now it’s over to the professional to do the scary stuff, the elements and powering up any potters out there will know just how exciting this is.

So, I’ve made 23 yarn bowls so far, and with the help of the magical Peter Stone, have cobbled together an advert for the Wool Fair programme, which looks, well, I can hardly believe I made that bowl. The photo looks totally amazing. There is no way in the world that I could have taken such wonderful photos.

I will update this post when I have more time and I’m hoping to get a post on the refurb and my right royal…. well, I really messed up, but we managed to sort it in the end, no thanks to me!

New yarn bowls, new techniques and why I don’t blog very often

Image

Science Museum SingaporeLamp Post at Wat Pho, BangkokHubby's leg and Giant Ray

Ughhh I just spent the last 2 hours writing this blog post only to have wordpress lose it even after making multiple saves….

Ok, why don’t I post very often? I’m too busy DOING to have a lot of time or oomph for blogging. Why do I bother with a blog? I’m an artist, I need to get what I’m doing ‘out there’ for people to see. How else will the right person fall in love with one of my pieces? So I tell peeps I have a blog, and say that’s where you can see my work.

Anyway, I’m going to be at the http://www.bristolwoolfair.co.uk/ in September selling my yarn bowls and buttons. So I really won’t be on here much at all as I will be as good as living in my studio for the next 3 months trying to make enough for the 3 days. Luckily I only work 2 days a week now. Just enough to pay for my studio while I get making. Besides, it’s all my boss’s fault, she’s the one that picked up the flyer for the fair. Just as well I gave her a yarn bowl!


What have I been doing since my last post? Well, apart from having been to Oz and back for the first time in 12 years and having a massive shopping spree in Phahurat Market in Bangkok on the way back for loads of gorgeous lace and lace fabric and embroidered fabric to use in my studio, I’ve been busy working out a few ideas for various projects.

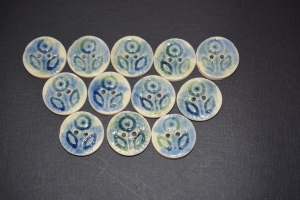
Lace imprint buttons

Thanks to my visit back to the land of Oz and the brief visits to Thailand and Singapore, I’ve been really feeling that Asian zen influence, especially after our visit to Wat Pho, the Temple of the Reclining Buddha. So I’ve been making tea mugs, sort of like the ones you get in Wagamama’s made in that nasty plastic that makes the green tea smell weird. Well, I’ve been making them out of porcelain, flecked stoneware, my mixed up reclaim made of the different clays I use and most recently the Vulcan smooth (a sculptural clay that looks and feels like a stiff-ish dark chocolate fondue that throws well, but does go to slip a little too easily).

Tea Mugs

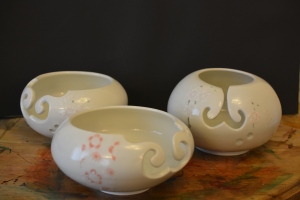
And of course I had a go at making yarn bowls out of my porcelain reclaim. That was fun, but they did slump a little, but that’s ok, they gave me a chance to try out my wonderful new ceramic tissue transfers. These you can use on fresh clay, leather clay, bisq – under or over the raw glaze. The only time I don’t think they will work is on-glaze. I’ve had such excellent results that I’m going to look into making my prints.

Porcelain Yarn Bowls

As well as that I’ve been tackling my avoidance of making lidded vessels. So far I have a few little pots with lids, and hope to be making teapots in the coming months, it’s my own silly fears that have held me back from that, so I’m now going for it, every time I have some reclaim to muck around with I WILL make lids!

One last thing, Bath Artists’ Studios where I have my space, are now doing open days 10.30 am to 12.30pm last Friday of the month. There is even coffee and nibbles. A chance to come see what we are all doing!

Time just flies by, doesn’t it?

So I did get the urns to the glaze stage, but then they went really really wrong. Silly me, never having worked with paper porcelain before had no idea that it can warp so much in a glaze firing. One fell over and the other kind of twisted a bit and the lid totally fused to the body. That kind of knocked the stuffing out of me and I had to step back for a few weeks, I couldn’t even bring myself to blog about it till now.


 So then I tried using some Audrey Blackman Porcelain with fine molochite in it, I just got really frustrated with it, porcelain is fickle, so now I’m going to use the Potclays Grogged Pink (or I might even use the Scarva Professional Black, not sure yet). It comes out a very nice earthy tone at 1280C, and if I use a temmoku on it, it will be a nice fat and shiny dark brown with a sheen of iron crystals on the surface and the glaze breaking to tan over edges and texture giving the form some natural detailing.

It was very silly of me to even think of using porcelain in the first place, Dad wasn’t a fine china sort of person, he worked with his hands most of his life, so using a nice groggy clay is more fitting. Anyway, his urn has had to go on the back burner until I have everything I can possibly make, made for the xmas markets I have coming up, I’ll be doing the next 2 Frome Super Markets, a small one in Bath organised by a friend, as well as the Bath Art and Craft Markets, 3 dates there which I am now managing.

Other than that, I managed to fit in a little side project on something that I really wanted to try, and the tests are really promising. More to come on that, I need to get the vessels glazed and sanded, but I must say I’m really excited over the whole project, even though it’s a departure from my mostly functional work.

Sorry, no pics this time, I couldn’t even bear to photograph the disaster on the kiln.

The Spaceship Urn part 2

Well, it’s been a hugely busy few weeks.
I went back to work, the pop-up shop opened, and I have finally managed to bisq fire the 2 surviving urns. Oh, and my hubby and I went to the Duxford Airshow (709 photos!?!?!?!?). We saw a Mitchell Spitfire with my last name on the side (sort of). My hubby’s last name is Mitchell….
Duxford Day Out (376)sml

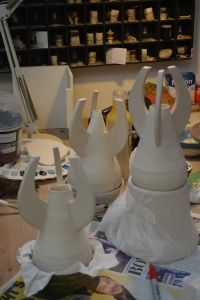
Well, 3 urns survived the turning/trimming process, but then, after I attached the fins, I knocked one over and all three fins came off. By that stage, the clay was way too dry to re-wet and attach, even though it’s paper porcelain. I used vinegar in the joining slip, but the join just didn’t seem to be good enough. So after that, I got the surviving two into the kiln for a soft bisq. It meant a not very full kiln, but I couldn’t bear to take any more risks. Now I just have to glaze them. I’m so excited and very very sad. Dad won’t get to see the finished result.

Making the fins was time consuming, starting with a very technical guide
Prowork2013 (148)

I then cut three blanks
Prowork2013 (149)

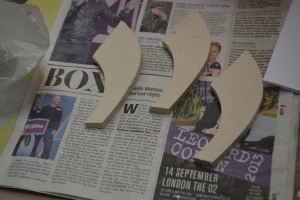
Which I carefully carved into streamlined shapes and attched them with a slip made from the clay and vinegar to get
Prowork2013 (152)

As you can imagine, it was a huge relief to get them into the kiln for their first firing. I don’t have to panic when I handle them now.

Now, about the pop-up shop…. WOW! The first week I only made a couple of sales, but the second week, my mugs were almost flying out the shop! Now, with just one week to go, I have very little stock left and have to get onto making again. Only 2 yarn bowls are left, out of 8. All of the ones I’ve featured have sold, it’s been very exciting. I know now that my work really is worth the effort so now I have to really knuckle down and make a shed load, literally. There’s a gallery that’s expressed an interest in stocking my work, the open studios weekend is coming up http://www.bathartistsstudios.co.uk/open-studios.html, and I need to get ready for the xmas markets I hope to do.

So that’s me. I’ve been dreading doing this post, and found I couldn’t during the week with my hubby away at work, and now I’ve left it to the last minute. Only two more posts to go on this, and then back to yarn bowls and swirly mugs, and no more play/product development till xmas is gone again.

The Spaceship Urn

[/caption]all6

My Dad died last Saturday (30th June). It was sort of a shock, but not 100% unexpected.

Anyway, me being an Aussie Expat living in the UK, and my parents being in Oz, I wasn’t able to go back for the funeral. However, I am able to make a contribution to Dad’s next great adventure and what better than a spaceship?

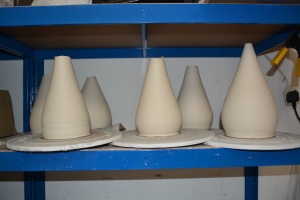
Being primarily a thrower, the classic 1950’s rocket style ship lent itself most handily to my design. The clay I chose (after very careful thought) is Scarva Porcelain Paper Clay. I’ve tried quite a few different clays in my time, but the most unusual to throw with has to be this. It’s pulpy, and doesn’t form a slip in quite the same way. So I started throwing them yesterday and ran out of clay, which is just as well as I wasn’t coping on my own too well.

Because of the size I’m making, I’m throwing 2.5kg at a time so I’m only getting 2 vessels to a bag. So my hubby took me off to Bath Potters (again) for more clay. £53 is cost me for 25kg!! But for this, no expense will be spared.

Today was easier, and there were lots of people around so if I wanted to talk I could and I did quite a bit of wandering around between vessels. So at the end of the day, I had another 4 made, as well as thier saggar slabs (for the glaze firing). And I managed to make a couple of swirl mugs as well.

 So back to these spaceships….. Why so many if you only need one you ask? Well, I need some redundancy, as well as each one will end up with its own personality and I probably won’t know until I’ve glaze fired them which one I will choose. Then I will do the lustre firing. I bought gold, platinum and blue to do the markings and such. AND I plan to name it the R.A.S.S Neil Cross (Royal Australian Space Ship) and hopefully I will be able to stamp that on with the lustre to give it that true Star Trek/Honor Harrington feel rather than clumsy and hand painted.

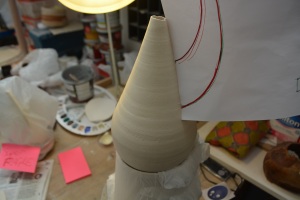
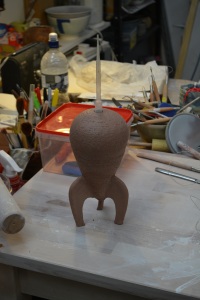
So anyway, the ships are going to turn out like the unfired junkyard dog in the next pic, only in porcelain and I will seal the bottom and cut the top off adding a small ring inside the lid to give it a gallery. The spike/antenna will be fired separately and added after all of the firings, this will reduce the height and reduce the chance of it actually slumping over at max temp.

the spike is just a plastic dropper to give an idea of the finished product the spike is just a plastic dropper to give an idea of the finished product.

Now I have to wait a day or 2 before I can do the next step which is trimming them into the desired shape. One of the advantages of using the porcelain paper clay is its more robust on account of the flax fibres and the end result is lighter and stronger so will travel better. That’s it for now, more when I get to attach the fins which I will cut tomorrow and get drying before I shape them, that paper clay is WET!

Fresh from the Kiln

SwirlDuo

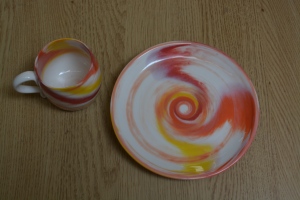
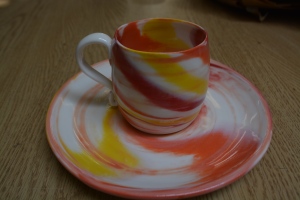
I have recently had an intern with me, for an entire month, and I decided to start a project I had been planning on doing since I got into my studio but had been putting off because I hadn’t had the time to do it as well as everything else.

That project is coloured clay. What I have to say is WOW instant addiction or what?!?!? This Technique is totally awsome. We used the Harry Fraser Porcelain powder simply because it’s in a convenient powder form, and added 5% hi-fire stain to it, made it into a slip and left it for a few days to soak, then we started working with it. Some of the colours didn’t really work, like the pink, that went a funny grey green colour, but the others are so intense, like the yellow, red and jaffa orange in the photos.
To get the swirly effect, I coned some Audrey Blackman Porcelain, then started to throw, but added sausages of colour which I really pushed into the clay, then I just recentred and threw the pieces. We also had a go at making a loaf, which turned out pretty awsome too. Definitely something I want to continue to experiment with in the future.

SwirlDuo(2)

Porcelain Bowl

Image

Porcelain Bowl

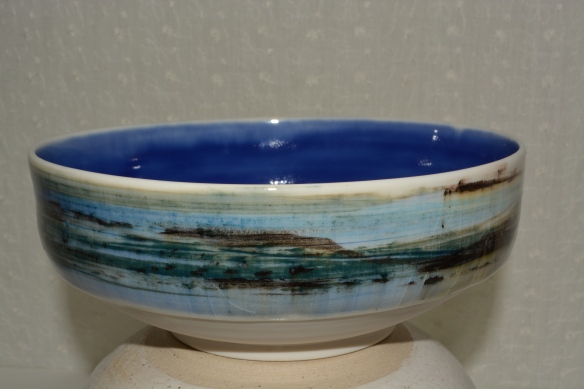
This is one of my favourite pieces. I painted some hi-fire stains on the raw clay just after I turned it. Then I used just a clear glaze over the top. I think it got a little over fired as the glaze moved a little giving that gorgeous blurring and creating a landscape effect. I only glazed the bowl to the inward curve, so there is a ‘pooling’ of the glaze that exaggerates the curve. Inside is simply glazed with a trasparent cobalt glaze. I used the Audrey Blackman porcelain for the bowl which IMHO is one of the best affordable porcelains avaliable.

This bowl will be for sale in the pop-up shop in 2 weeks time along with the yarn bowls I have featured already. After this next selling event I will be starting an Etsy shop as well as various markets.

I am doing a Pop Up Shop!!

DSC_0094As I already mentioned, I will be doing a pop-up with a group of other locally (Bath) based artists. A lovely lady and fellow local artist by the name of Gill Silversides is organising it and was kind enough to invite me to take part see the website here http://poptartbath.wordpress.com/. So I will be selling some of my yarn bowls and few other choice items there and doing a few stints looking after the shop.

Also, a few months ago, a lady came into our shop (where I work) and asked for some donations of items for a charity auction for the local Alzheimers drop-in center, so I donated one of my yarn bowls. The lady came back yesterday and said that it went for £32.50 after a bit of a bidding war between 2 ladies. That pleased me no end.

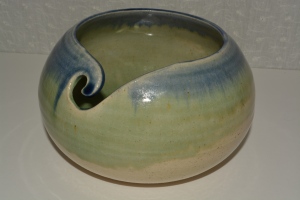
Anyway, here’s another of my yarn bowls. This one is just a layering of 2 glazes. A cobalt stained glaze over a copper green. I really like the way these two glazes move together and produce what looks like rain over grasslands.

I don’t only make yarn bowls, its just that I know there aren’t that many potters here in the UK making them, and I know how useful they are to the dedicated yarn artist, and they were good project to do once I got my throwing skills back. That does not mean I won’t be making any more, I will just make as I sell to keep a nice selection in stock.

More recent work

DSC_0127

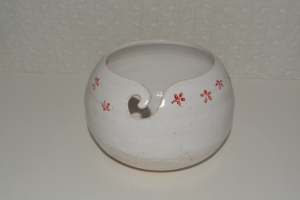
This is another of my yarn bowls. It is the Scarva Speckled Stoneware again, but this time glazed with an earthenware tin white which I then fired to around 1280C. The little red majolica flowers are Spectrum xmas red underglaze which I applied after applying the glaze. The underglaze sank into the glaze while the glaze sank into the clay. The result is a fresh white ground with the fleck from the clay coming through making the glaze seem a natural extention of the clay underneath. The tricky part was applying it. With out the spray booth I had trouble getting an even all over coat, neither dipping nor brush on, something about the glaze doesn’t want to play nice, and if it gets too thick, it crawls, luckily this bowl made it through with flying colours.

I will be selling this bowl and the one in the previous (first) post in a pop-up shop next month, along with about 6 other yarn bowls. What doesn’t sell I will put onto Etsy. The shop will be in Bath, next to At Sixes and Sevens, opposite Blacks and will be there for a month. A lovely lady amd fellow artist by the name of Jill is organising it, and there will be several local Bath artists involved. If you happen to be in Bath in July, do come along, it will be amazing